Learn How to UsePropGuard
Step-by-step guides to help you learn and master every feature of PropGuard. From adding your first account to advanced analytics and referrals.
Step 1: Navigate to the Accounts tab
Click "Accounts" in the sidebar (desktop) or bottom navigation bar (mobile).
Step 2: Add a new account
- 1.Click the "Add Account" button (blue button with a "+" icon at the top of the page).
- 2.A modal will appear with a list of supported brokers. You have two options:
- −Select a predefined broker from the list (e.g., FTMO, MyFundedFX, etc.). You can use the search bar to filter.
- −Select "Custom Broker" at the bottom if your broker is not listed.
Step 3: Select a challenge (predefined broker only)
If you selected a predefined broker that has challenges:
- 1.A list of available challenges will appear (e.g., "100K Challenge", "200K Challenge").
- 2.Use the filter bar to search by name or account size.
- 3.Click on the challenge you want. Some fields will be pre-filled automatically.
Step 4: Fill in account details
- 1.Account Name (required) - Give your account a recognizable name (e.g., "My FTMO 100K").
- 2.Account Initial Balance (required) - The starting balance of the challenge (e.g., 100,000). Pre-filled if you selected a predefined challenge.
- 3.Profit Split (required) - Your profit split percentage (e.g., 80).
- 4.Price (optional) - How much you paid for the challenge.
- 5.Daily Loss Calculation Type - Choose between "Balance" or "Equity" based.
- 6.Snapshot Recalculation Hour - The hour (UTC) when daily loss resets.
If you chose Custom Broker, you also need to fill in:
- −Broker Name (required)
- −Challenge Name (required)
Step 5: Create the account
Click the "Add Account" button at the bottom of the form. A success toast notification will appear and the account will show up in your accounts list.
Step 6: Open Challenge Stages
- 1.Find your newly created account in the list.
- 2.Click the three-dot menu (vertical dots icon) on the account card.
- 3.Select "View Stages" from the dropdown menu.
- 4.The Challenge Stages modal will open.
Step 7: Add a step
- 1.In the Challenge Stages modal, click the "Add Step" button (top-right corner).
- 2.Fill in the step details:
- −Step (required) - Select from dropdown: Step 1, Step 2, Step 3, Step 4, or Funded.
- −Max Daily Loss (%) - e.g., 5
- −Max Loss (%) - e.g., 10
- −Profit Target (%) - e.g., 8
- −Min Trading Days - e.g., 5
- 3.Click "Add Challenge Stage" to save the step.
Step 8: Connect a trading platform
After adding the step, you will be taken to the "Connect Trading Platform" screen (step 2 of the wizard). You can also reach this later by clicking the "Connect Platform" button on any step in the Challenge Stages modal.
- 1.Select Platform - Choose from: MT5, cTrader, Match-Trader, or TradeLocker.
- 2.Fill in the platform-specific credentials:
- −MT5: Login, Password (investor/read-only password), Server
- −cTrader: Login (Account ID), Client ID, Client Secret, Access Token
- −Match-Trader / TradeLocker: Login, Password, Server (Platform URL for Match-Trader), Account ID
- 3.Click "Link Trading Account" to connect.
A success notification will confirm the connection. Your trades will now sync automatically.
Step 1: Navigate to the Accounts tab
Click "Accounts" in the sidebar (desktop) or bottom navigation bar (mobile).
Step 2: Open the Withdrawals modal
- 1.Find the account you want to add a withdrawal to.
- 2.Click the three-dot menu (vertical dots icon) on the account card.
- 3.Select "View Withdrawals" from the dropdown menu.
- 4.The Withdrawals modal will open, showing a list of existing withdrawals (or an empty state if none exist).
Step 3: Add a withdrawal
- 1.Click the "Add Withdrawal" button (top-right of the modal, or "Add First Withdrawal" if the list is empty).
- 2.Fill in the form:
- −Amount $ (before Profit Split) (required) - The total withdrawal amount before your profit split is applied (e.g., 1000).
- −Comment (optional) - Any notes about this withdrawal.
- 3.Click "Add Withdrawal" to save.
The withdrawal will appear in the list with the date automatically recorded. You can close the modal by clicking "Close".
The Dashboard is the main page you see after logging in. It provides a real-time overview of all your connected trading accounts in one place.
Filter Bar
At the top of the Dashboard, you can filter which accounts are displayed: - All - Shows data from all connected accounts (challenge + funded). - Challenge - Shows only accounts currently in a challenge/evaluation phase. - Funded - Shows only funded accounts.
Stats Summary
Four key metrics are displayed at the top: - Accounts Balance - The combined current balance across all active connected accounts. - Open P/L - The total unrealized profit or loss from positions that are still open. Shown in green (profit) or red (loss). - Win Ratio - Your overall win rate percentage across all closed trades. - Closed P/L - The total realized profit or loss from all closed trades. Shown in green (profit) or red (loss).
Charts
Two line charts sit below the stats:
- −Accounts Balance - Shows how your total balance has changed over time. You can toggle the timeframe between 7d, 30d, and 90d using the buttons in the top-right corner of the chart.
- −Accounts Profit - Shows your cumulative profit history over time. Also supports 7d, 30d, and 90d timeframes. The line color is green when overall profit is positive, red when negative.
Tabs Section
The bottom section contains four tabs:
1. Active Accounts
2. Positions
3. Pending Orders
4. Closed Trades
Account Dashboard
Clicking on any account in the Active Accounts tab opens the Account Dashboard, a detailed view for that specific account showing its individual positions, orders, and trade history.
The Trade Journal automatically logs all your closed trades from connected accounts and organizes them by date. It lets you review your trading history and add personal notes.
View Modes
At the top-left, you can switch between two views:
Calendar (default)
List
Month Navigation
In the center of the header, use the left/right arrows to navigate between months. Journal data is loaded per month from the backend.
Day Detail Modal
Click on any day (in either Calendar or List view) to open the Trading History modal. It contains:
Day Notes section at the top:
Summary section with four metrics: - Total Trades - Number of closed trades that day - Win Rate - Percentage of winning trades - Most Traded - The symbol you traded most frequently - Total Profit - Combined P/L for the day
Trades table listing each individual trade with:
The Statistics page gives you a high-level financial overview of your prop trading career — how much you've spent on challenges, how much you've been paid out, and where your failures happen.
Stats Summary
Four key metrics are displayed at the top: - Net Profit - Your total payouts minus total challenge fees. Shown in green (positive) or red (negative). - ROI - Return on investment percentage (payouts relative to fees spent). - Total Payouts - The total amount you've received from all withdrawals across all prop firms. - Total Challenge Fees - The total amount you've spent on challenge purchases.
Charts
Row 1
1. Cumulative Net Profit (line chart)
2. Monthly Net Profit (bar chart) Each bar represents one month. Green bars are profitable months, red bars are losing months. You can filter the timeframe using the buttons in the top-right corner: - 6M - Last 6 months - 1Y - Last 12 months - All - All available data
Hovering over a bar shows a tooltip with net profit, payouts, and fees for that month. Clicking a bar opens a Monthly Summary popup with: - Net Profit for the month - Total Payouts received that month - Challenge Fees paid that month
Row 2
3. Prop Firm Performance (table)
4. Failure Reasons (doughnut chart)
A color-coded legend is displayed next to the chart with the count and percentage for each reason.
PropGuard has a referral program that rewards you for inviting friends. Share your unique referral link — when a friend registers through your link and upgrades to a Pro subscription, you earn 100 points. Once you accumulate 500 points, you can redeem them for 1 free month of Pro.
Refer a Friend Page Overview
Navigate to "Refer a Friend" in the sidebar (desktop) or bottom navigation bar (mobile).
Stats Summary
Four metrics are displayed at the top: - Available Points - Your current point balance that can be spent on rewards. - Successful Referrals - Number of referred friends who registered and upgraded to Pro. - Total Referrals - Total number of friends who registered through your link (including those who haven't upgraded yet). - Success Rate - Percentage of your referrals that converted to Pro subscribers.
Your Referral Link
The left card displays your unique referral link. You can:
- −Copy Link - Click the "Copy Link" button to copy it to your clipboard.
- −Share via - Use the built-in sharing buttons to quickly send your link through: Email, WhatsApp, X (Twitter), or Telegram.
How It Works & Redeem
The right card explains the three steps:
- 1.Share your link - Send your referral link to friends via any channel.
- 2.Friend subscribes - They sign up using your link and upgrade to Pro.
- 3.Earn 100 points - You receive 100 points for each successful referral.
Below that is the Redeem Your Points section showing: - Your current available points - The redemption rate: 500 points = 1 month of Pro - If you have enough points, a green message tells you how many months you can redeem - Click "Redeem for Pro" to spend 500 points and receive 1 free month of Pro subscription - If you don't have enough points yet, the button shows how many more you need (e.g., "Need 200 more points")
Points History
At the bottom of the page, a history log tracks all your point activity in two sections:
- −Referrals - Lists each referred friend with their name, email, date, and points earned. Friends who registered but haven't upgraded yet show a "Pending upgrade" badge instead of points.
- −Spent Points - Lists each redemption with a description, date, and points deducted.
Step 1: Go to the Open API Portal
Visit the official cTrader Open API website:
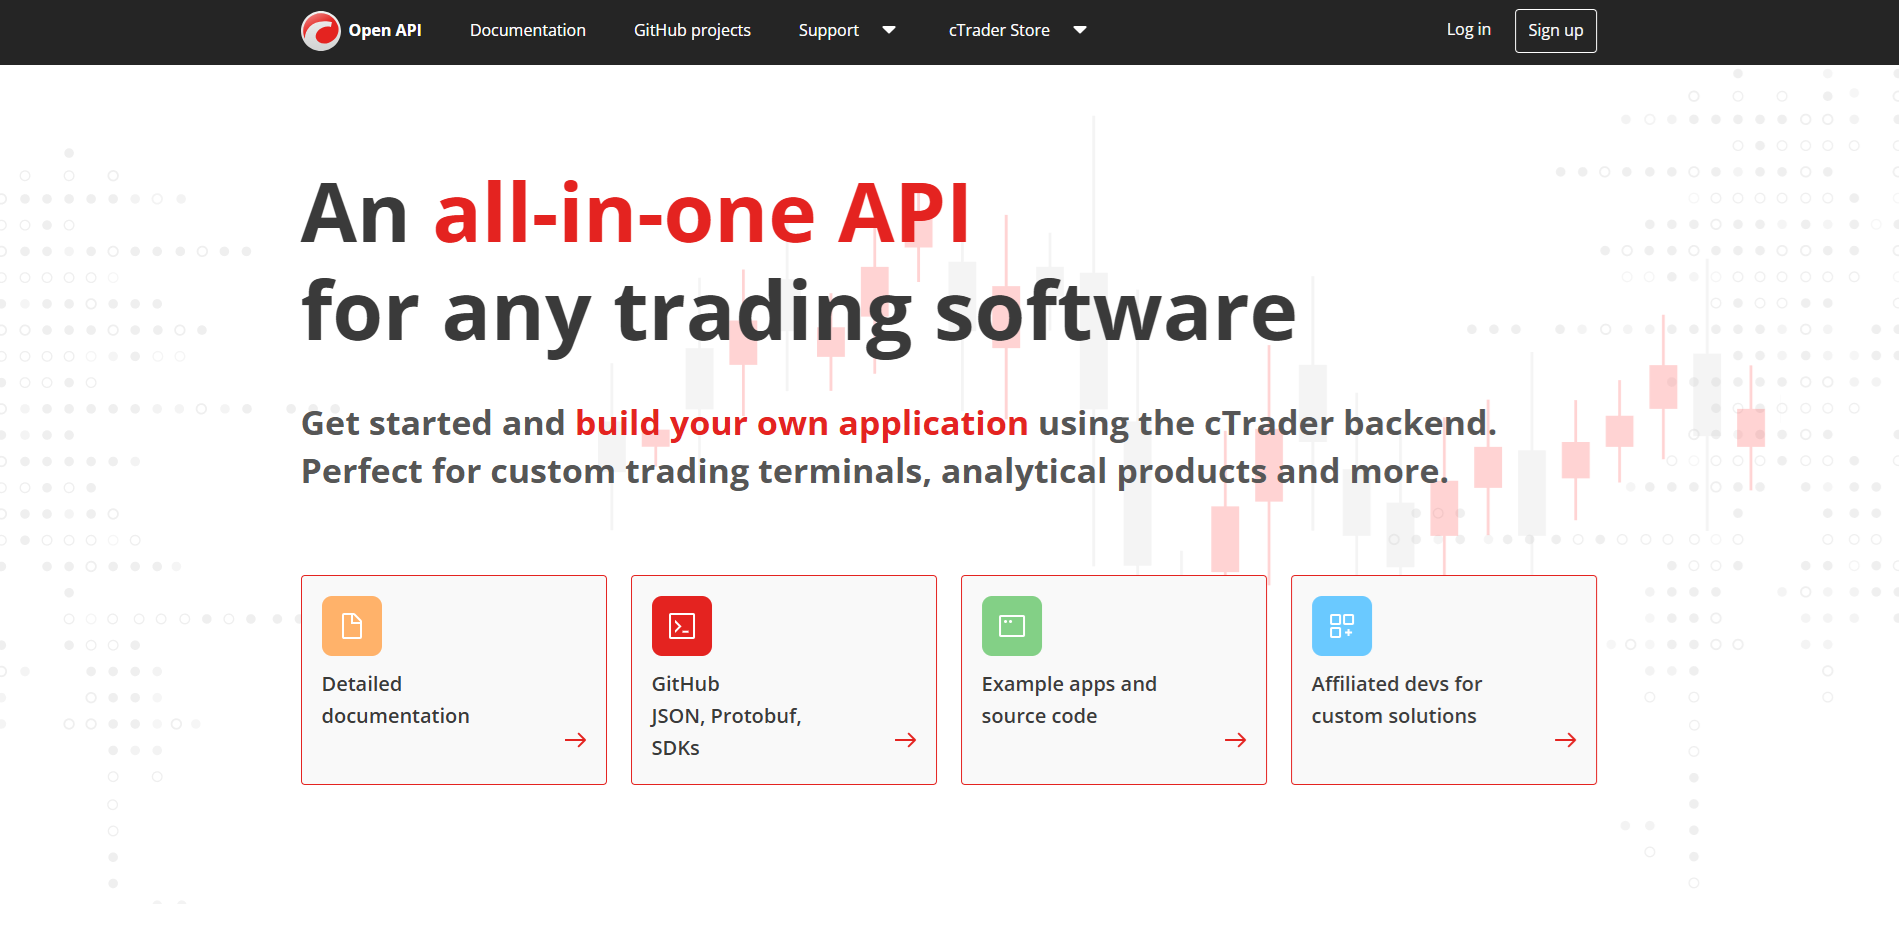
Click to enlarge
Step 2: Log In
Log in using your cTrader credentials.
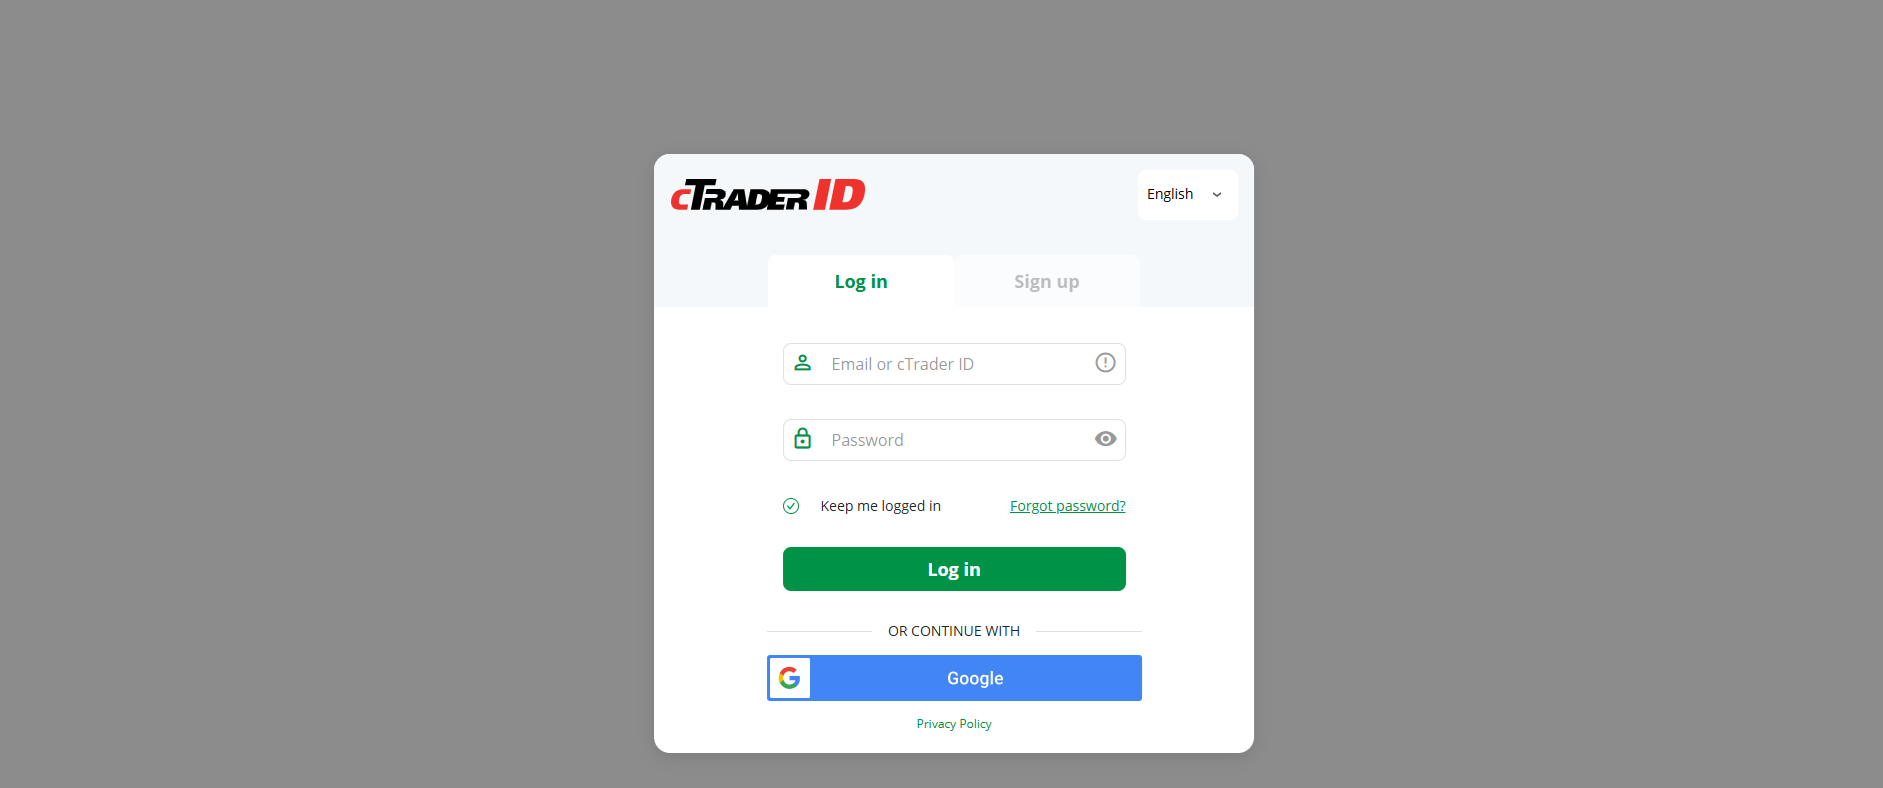
Click to enlarge
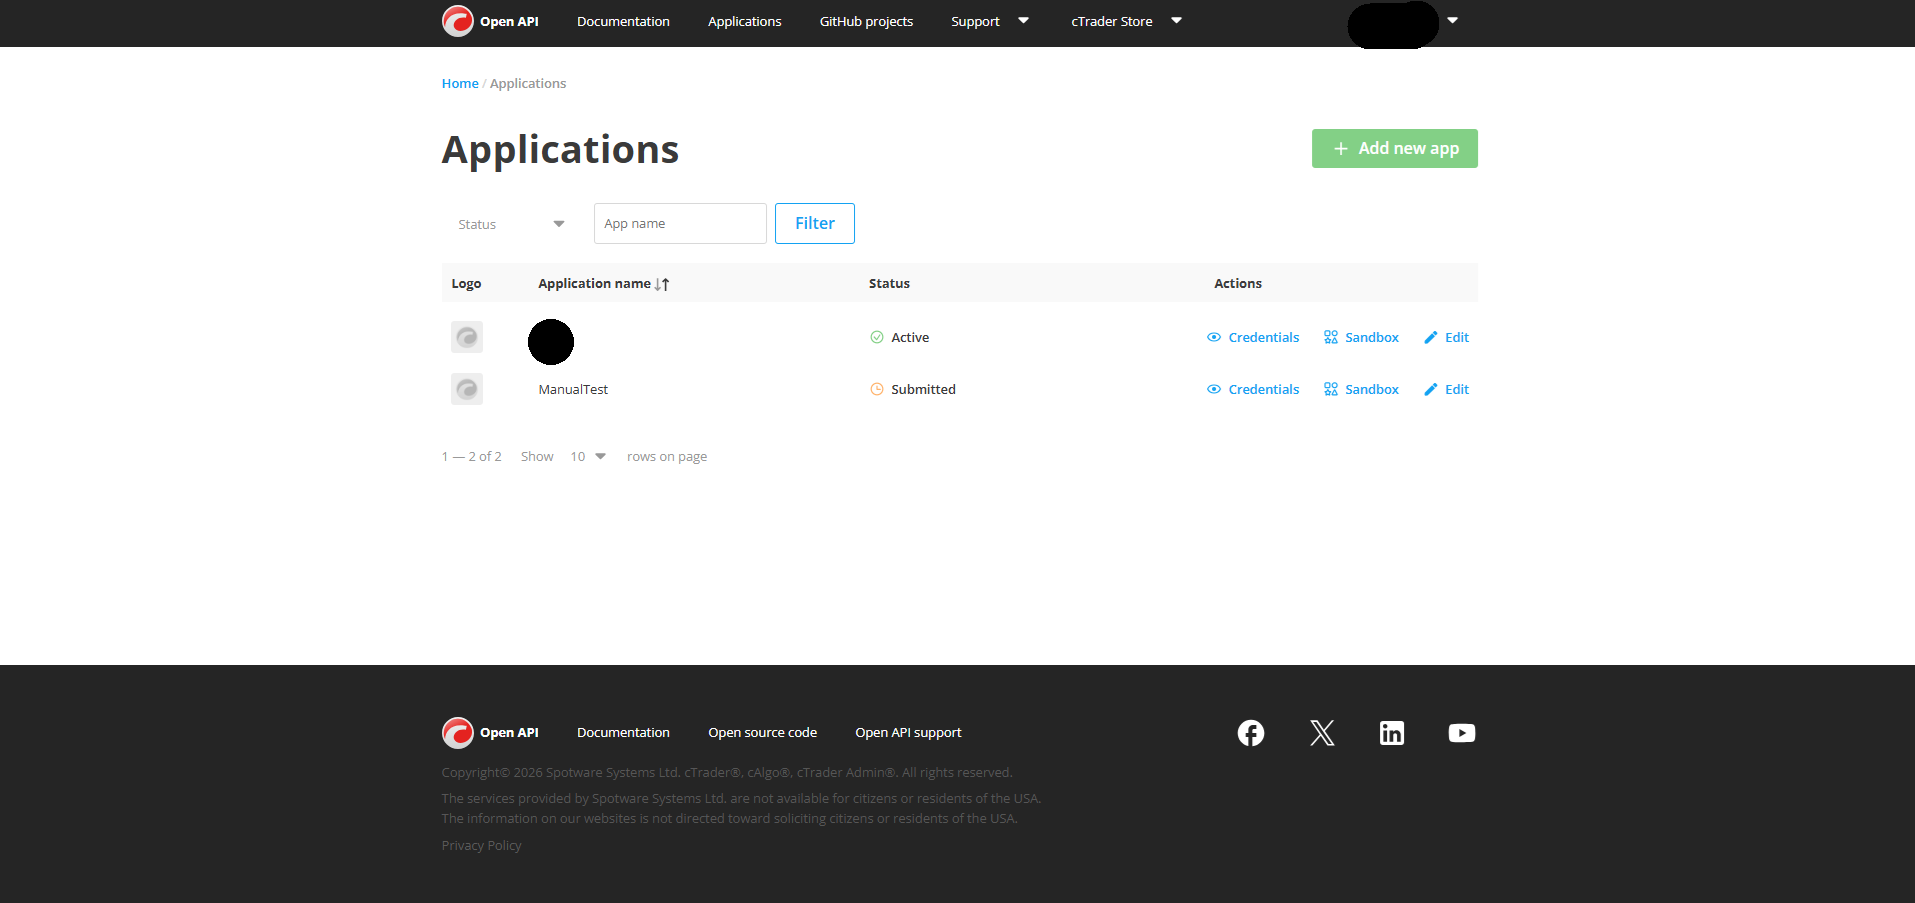
Step 3: Open the Applications Tab
After logging in, navigate to the Applications tab in the menu.
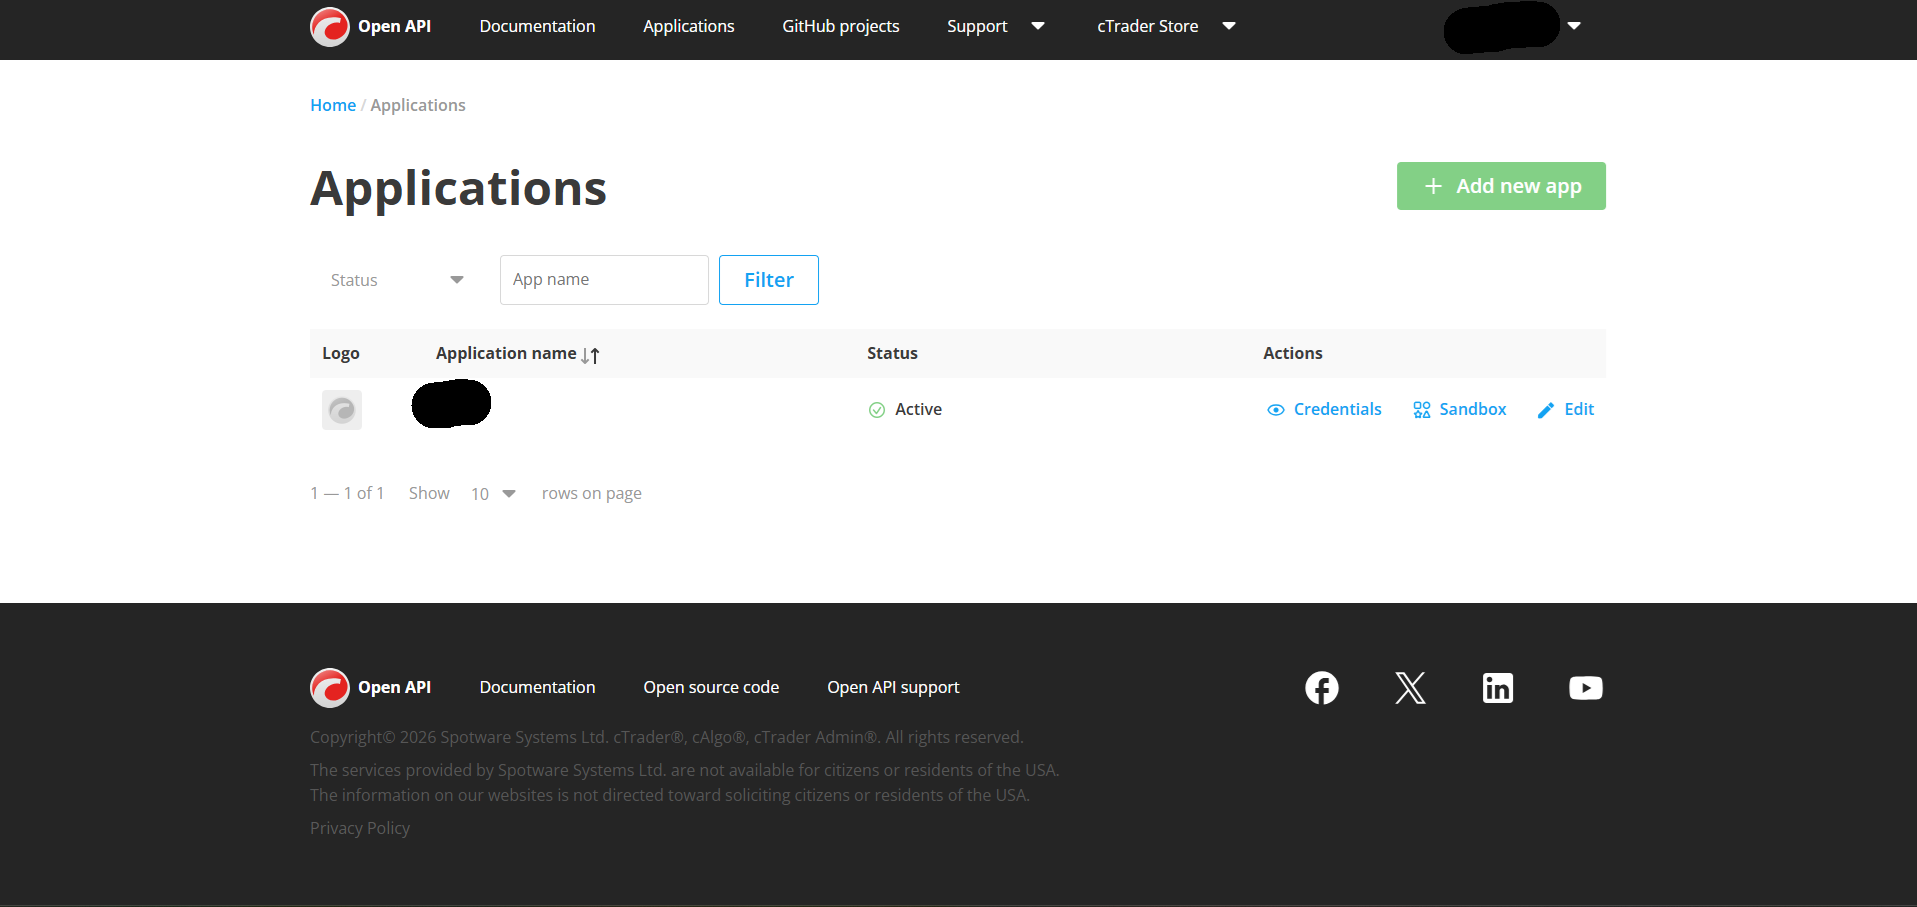
Click to enlarge
Step 4: Create a New Application
Click "Add New App".
You will be redirected to the application setup page.
Fill in the required information:
Click Save.
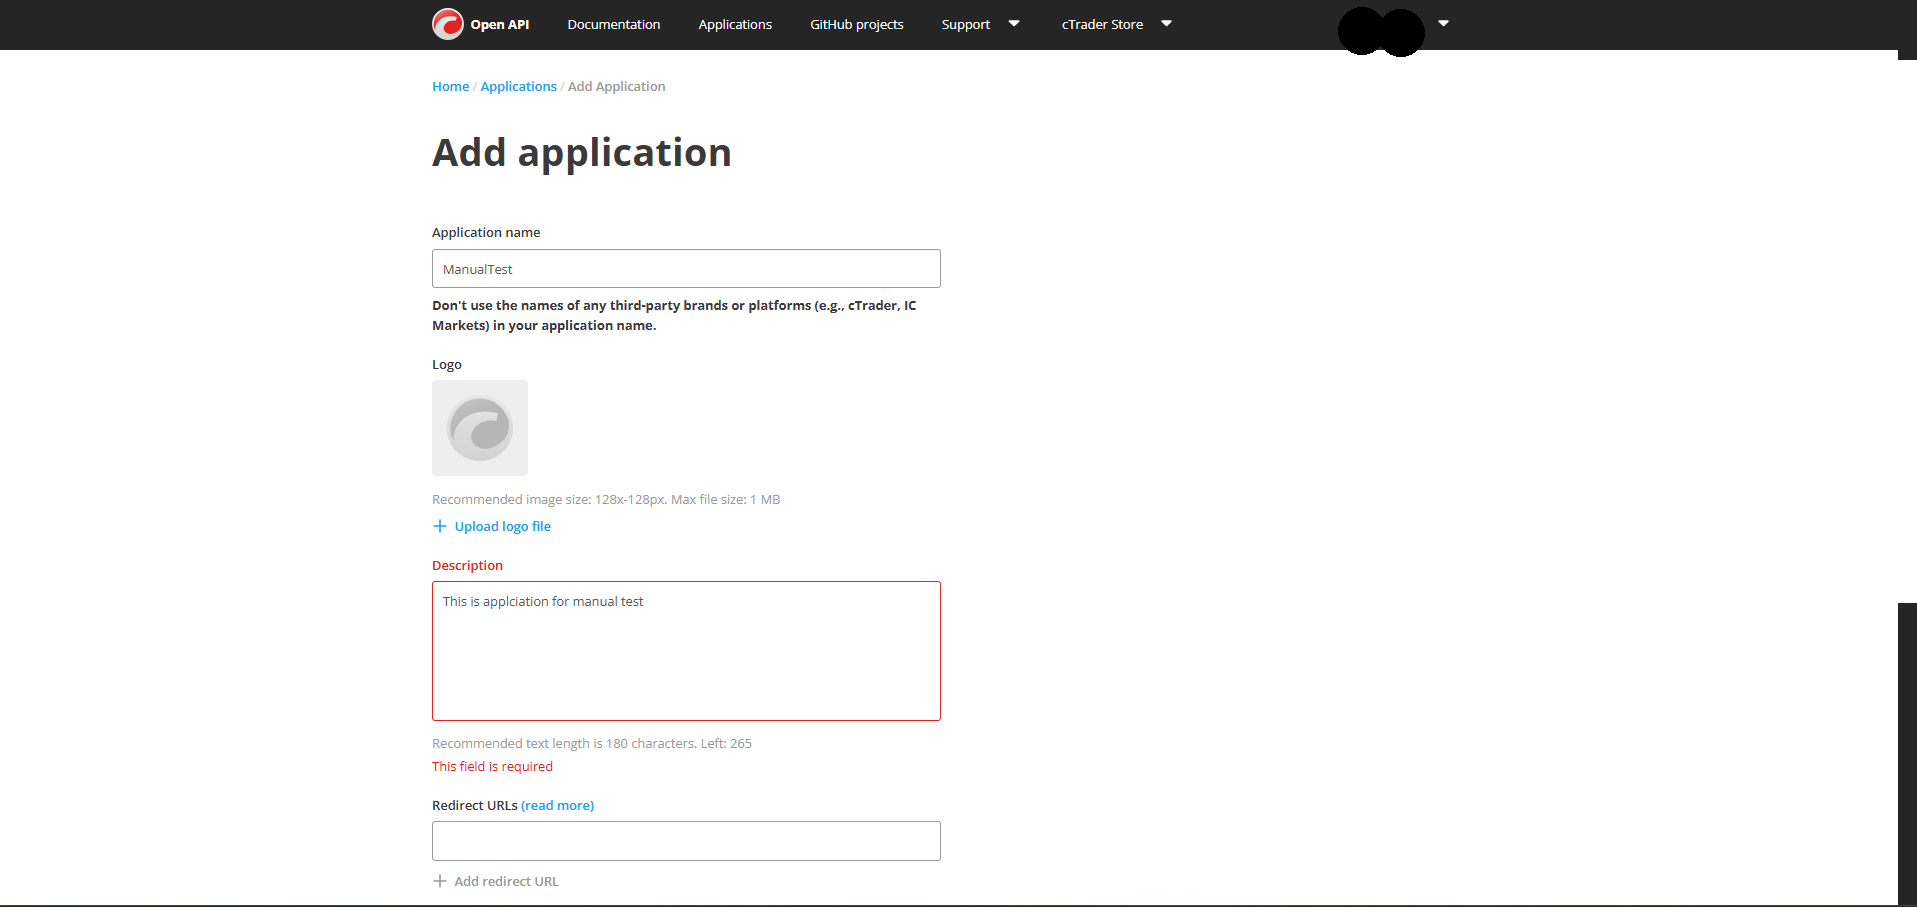
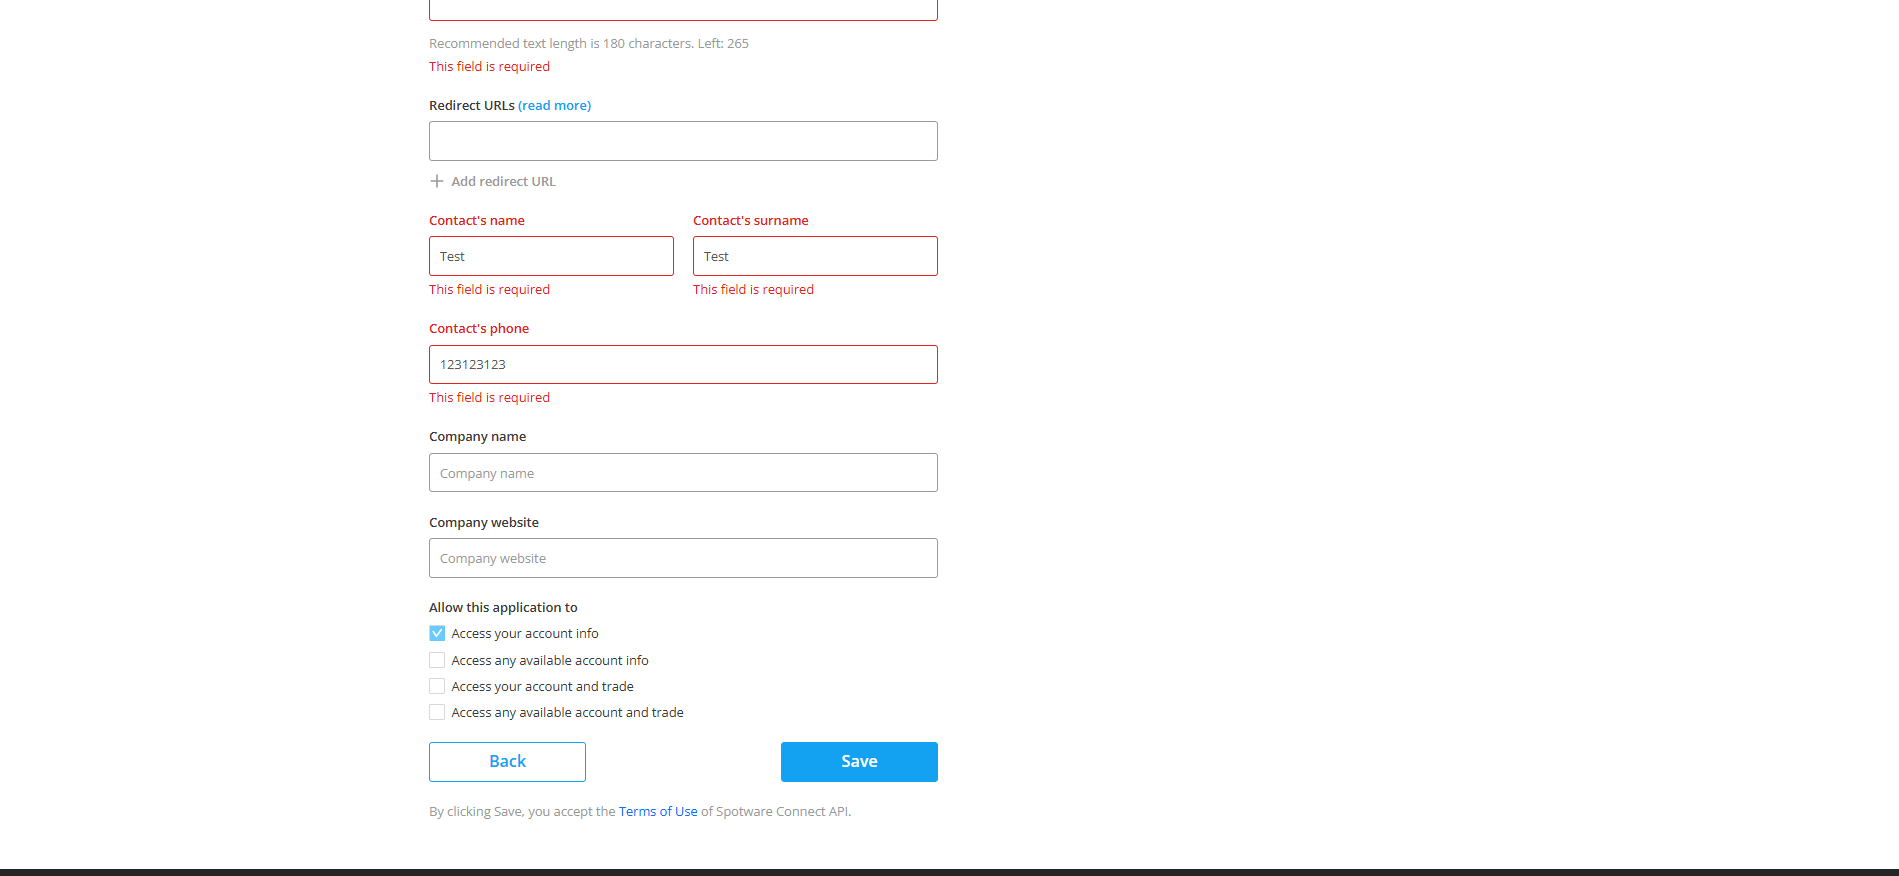
Click to enlarge
Step 5: Wait for Approval
After submitting the application, it will be reviewed and approved by Spotware Systems Ltd (the company behind cTrader).
Once approved:
Step 6: Get API Credentials
Click on Credentials next to your application.
Copy the following:
Click to enlarge
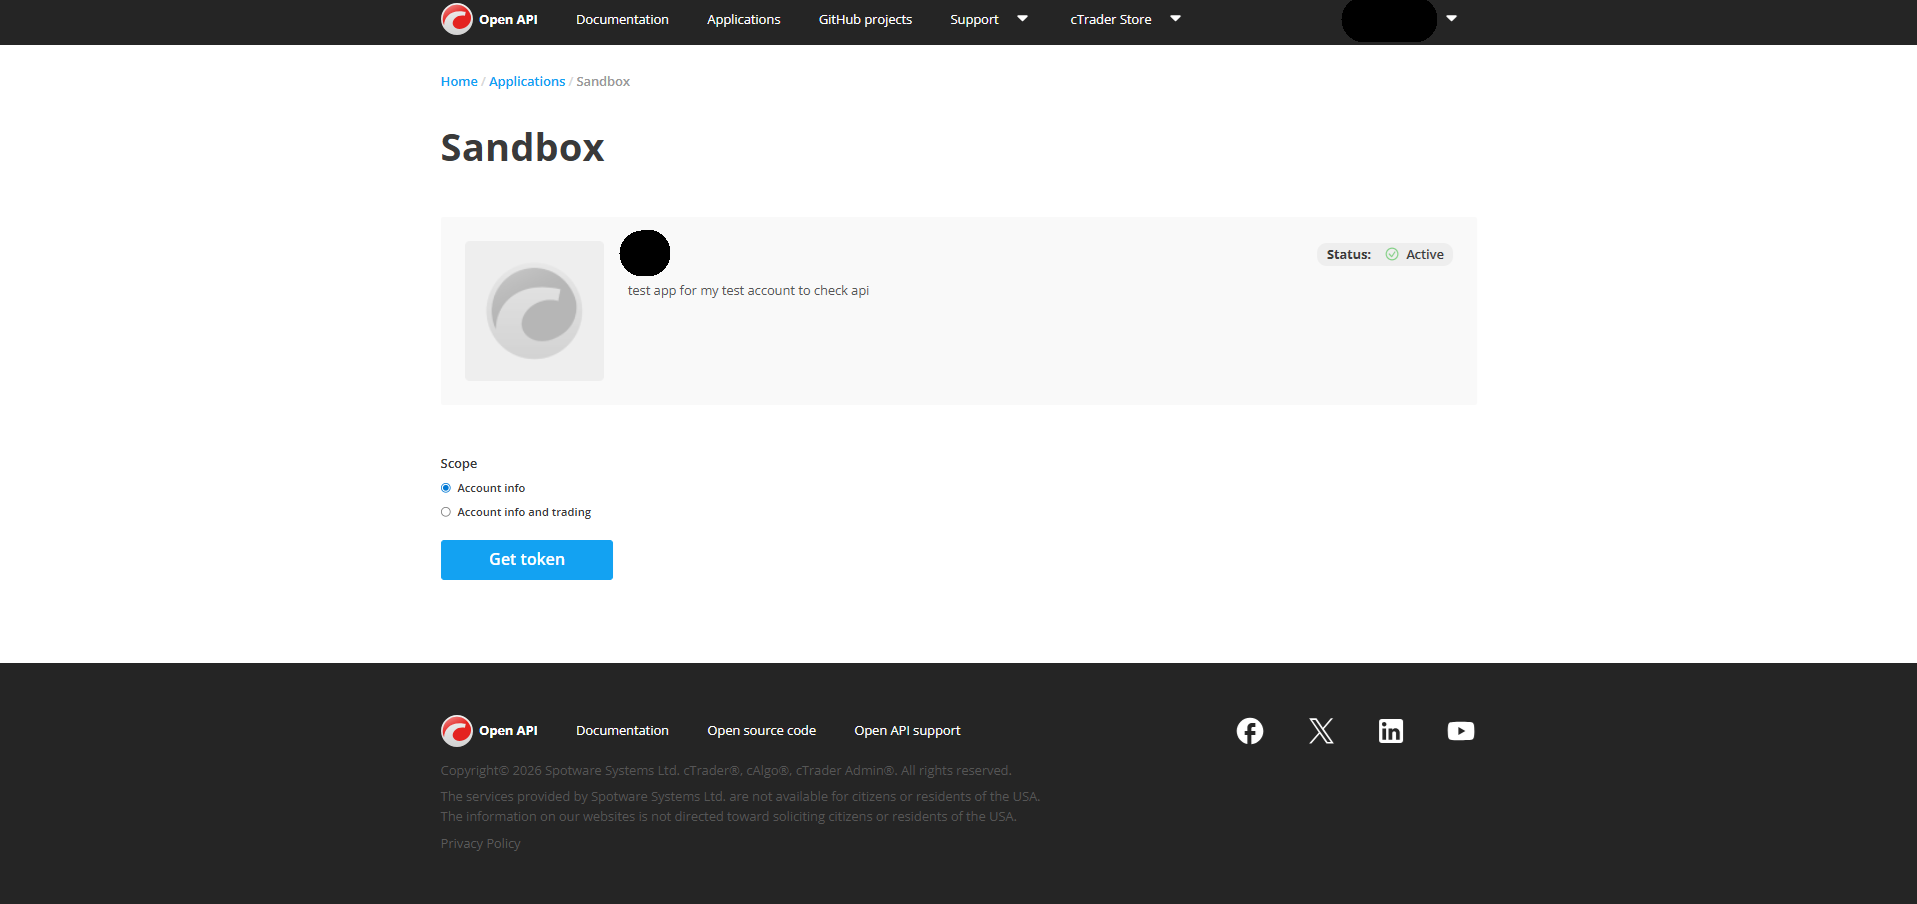
Step 7: Generate Access Tokens
Go to the Sandbox section.
Click Get Token.
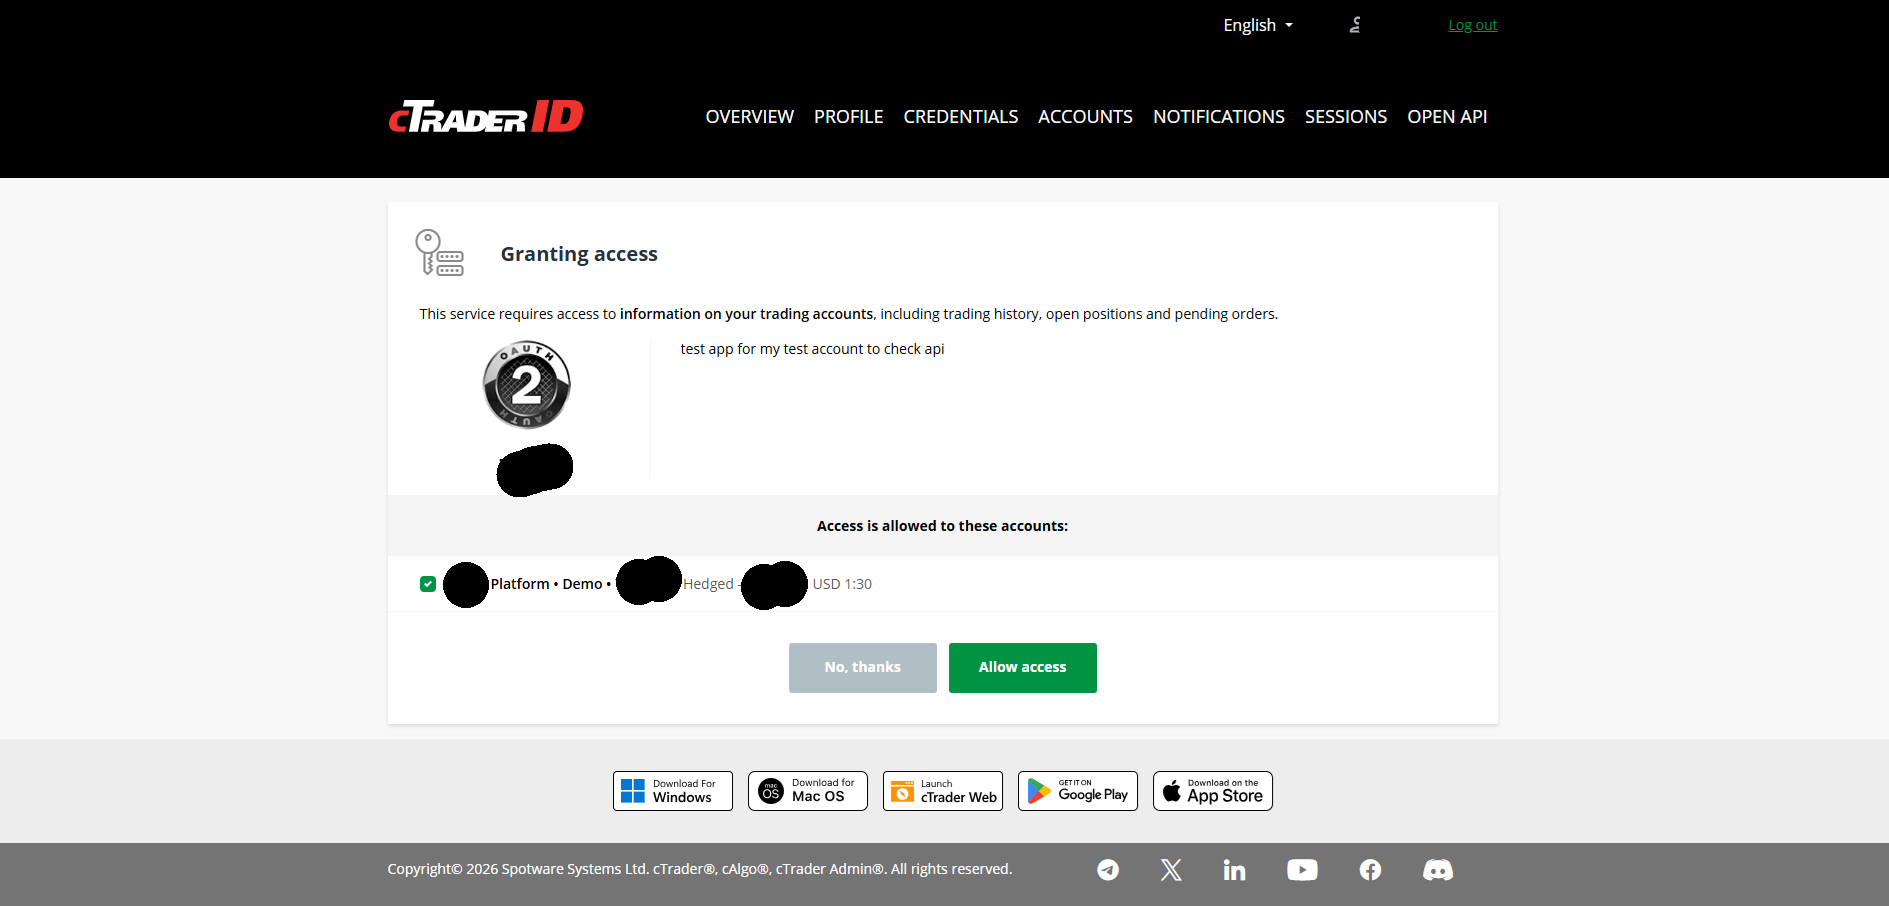
Select the trading account you want to connect.
Click Allow to authorize access.
You will then receive:
Copy both tokens.

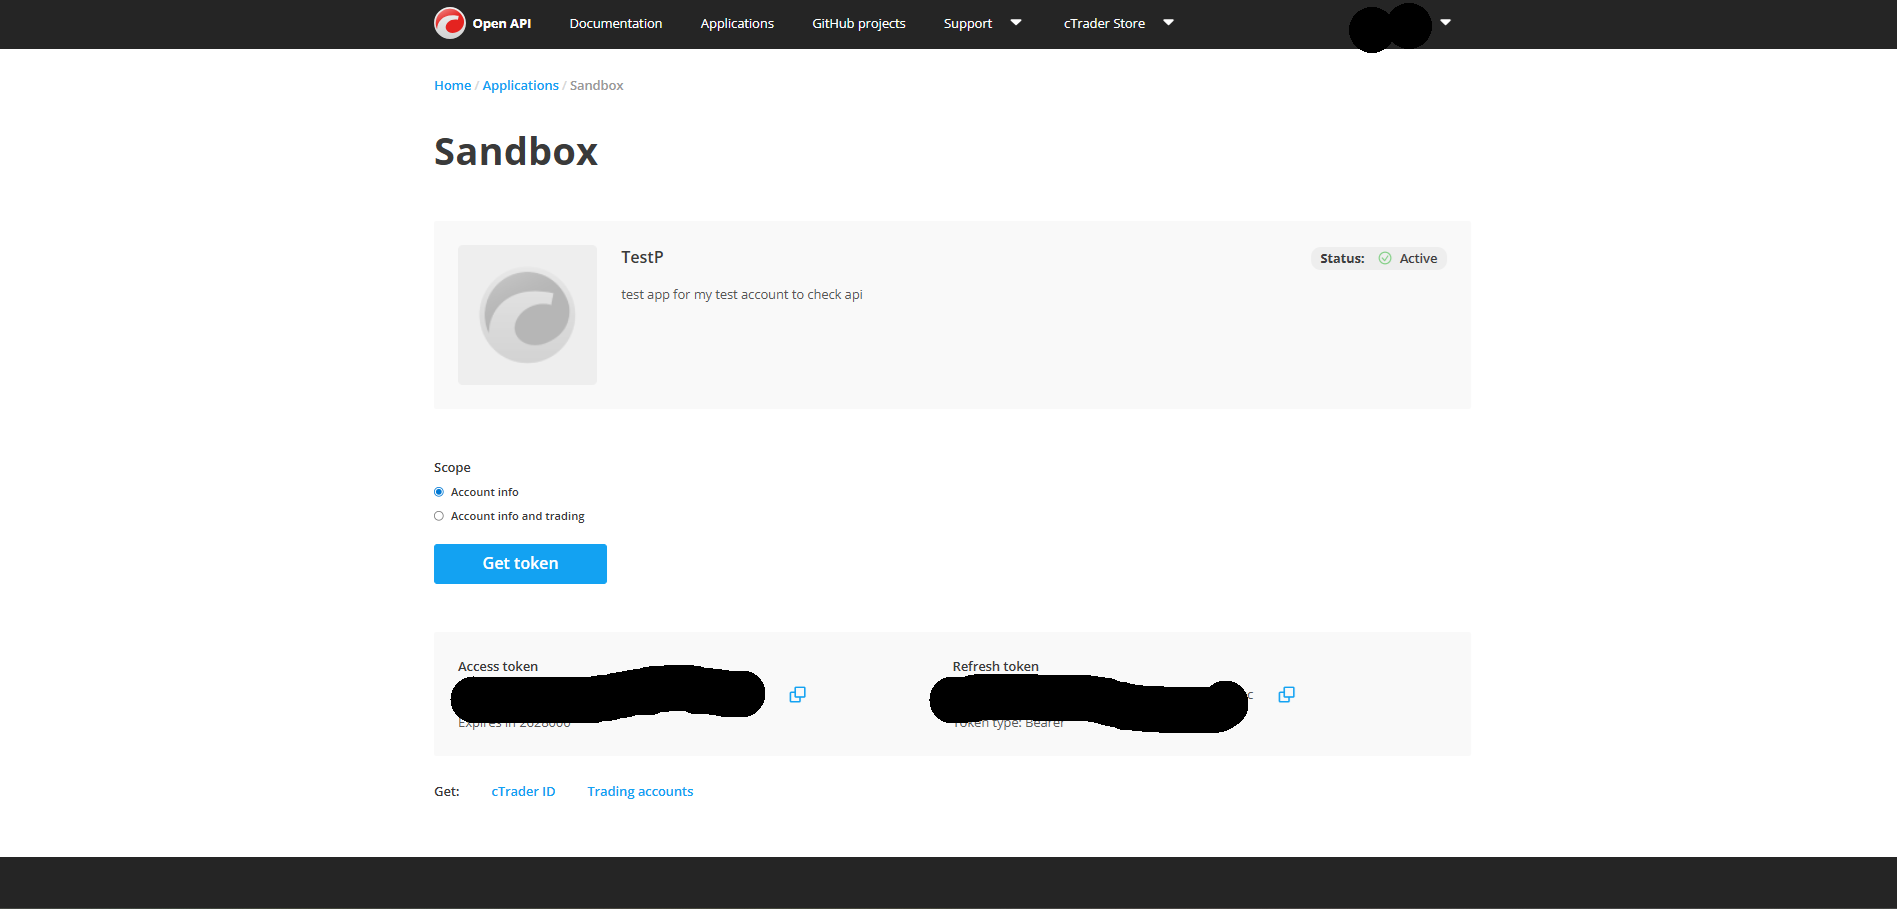
Click to enlarge
Step 8: Connect to PropGuard
With the following information:
You can now enter these credentials into PropGuard to enable automatic live data synchronization from your trading account.